Create a project
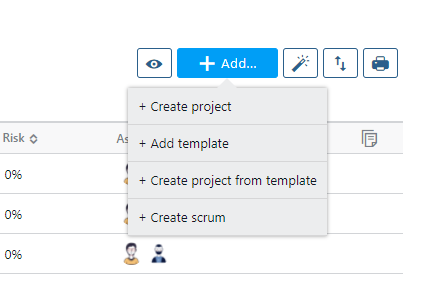
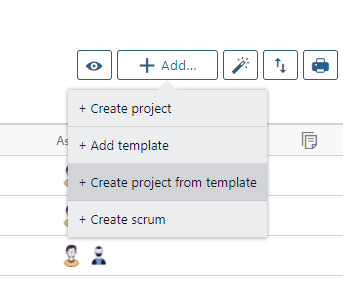
Click on suitcase icon on the right menu and then on project list; you will see by default your open projects and phases. Click on add button at the top right.
It gives you four options:
Create project: creates a new root project. You may then change and extend a project adding (phases) projects and changing timing, duration and efforts.
Create template: through this process you will be able to quickly create a project structure with eventually assignments as template, that you can reused in the future.
Create a project from template: with this function you can create a project starting from an already created template.
Create Scrum: this is a wizard that creates a new project using the Scrum agile method.
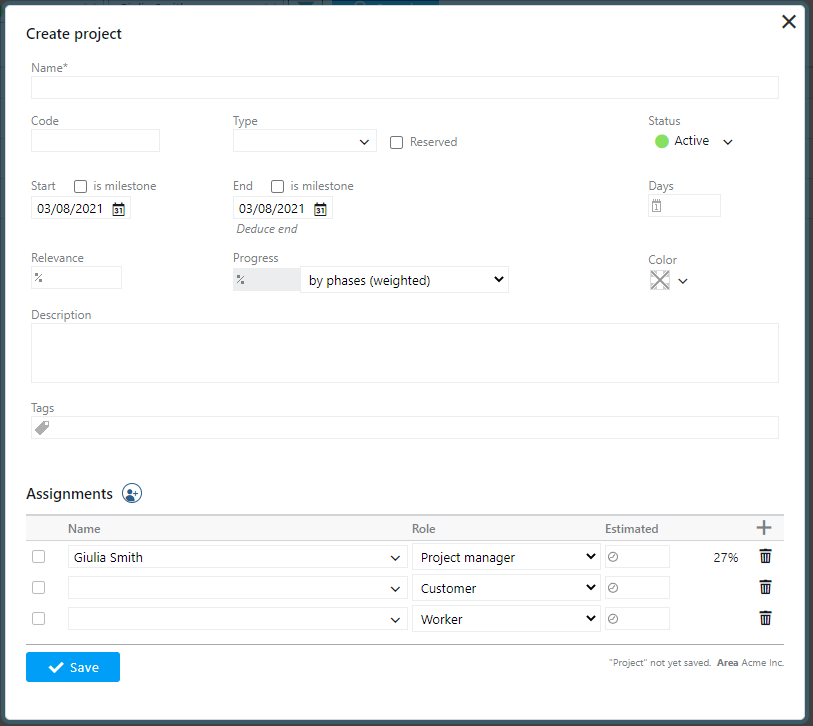
The easiest way to create a project is to press “create project” button that uses a compact editor:
In detail:
Code/short name: this is usually the mnemonic name of the project/phases. If your projects are related to external systems (such as an accounting systems) you can use that code. Code is not strictly required to be unique, but having a unique code may be useful.
When you are creating phases the code is proposed automatically by default as “code.1”, “code.2” and so on, but if you change the proposed code with “code.a” or “code.I” Twproject will try to guess the following codes with “code.b”, “code.c” or “code.II” and “code.III”.
Progressive number guessing is used widely in Twproject. If you change a phases code, and the phases already has children, the children (and descendants) codes will not be updated, as this may not be what is expected, and Twproject has no way to tell.Twproject can generate unique codes from phases types: if you select a type, didn’t type a code, and enabled this options in configuration: You can set codes to be unique, and it can be a quite comfortable choice. To set this, go to admin -> default for projects and enable “use unique codes”
.
Name: it is the common/descriptive name of the phases. It is mandatory and it is not required unique.
Each mandatory field is marked by *. You cannot save a form without filling each mandatory field, in case you try to do it the field will be enhanced as shown and the action is stopped.
Start/duration/end: as stated before, phases timing is one of most relevant information about phases. Start, end and duration are always consistent; this means that if you specify start and duration the end is computed, or if you specify start and end, duration is computed. Note that duration is computed in “working days”, considering (or not) Saturdays, Sundays (or Fridays) and your company’s calendar .
If you are changing dates for an existing phases, a popup will propose you to insert a reason for the change.
it is not mandatory to fill it. Every change will be recorded on the phases logs and the event is sent to the notification engine.
Milestones: in Twproject a milestone always matches the start or the end of a phases. This because usually a milestone is related to a delivery or a phase kick-off. Of course setting a milestone changes the behavior of the start/duration/end triplet; for instance if you set start and end as milestones, duration is disabled.
That’s all with dates? Not exactly, there are other cases where dates must obey constraints. For instance when a project has children: in this case the parent phases duration must be equal or greater than its children duration, and start must be the minimal date.

In this case if you try to shrink the duration of the parent, Twproject automatically sets the minimum duration as compatible with that of the children.
Another case is when there are dependencies between phases: in this case a following phase’ start must obey the end of predecessor (plus, eventually, a lag that can be positive or negative).

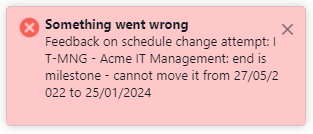
in case of dependencies, when you change dates/duration you may cause the propagation of date changes from children to parent along the whole tree.
If your phases tree is “pinned” by one or more milestones the propagation may fail: in this case you get an error message feedback:
Status: Phases’ status management in Twproject differs slightly from other project management software in the sense that Twproject is more… reality driven! To be more explicit, phase status and phase dates are not necessarily related. In Twproject it is correct to have an “open” phase after the phaseend date: we believe that this approach is more “real” and practical with respect to closing a phase automatically on the end date: the latter may have been fixed a lot of time before, and much may have changed in the meantime. Of course phase status must obey some rules related to dependencies, business processes, or status flow, but generally Twproject is more flexible than traditional project management software.
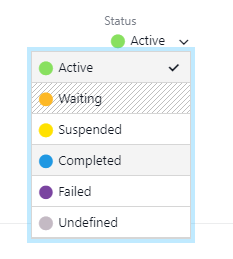
Active: it is a project you can work on.
If we are before the start date, the project will start, if we are after the end date the project is considered “late” and therefore will generate events of this type.
Active projects generate “workload” on their own date range.
The children of an active phase can be in any state.
Waiting: it is a state managed by the system. A phase is pending when it has a dependency on an “ACTIVE” project.
If we are after the start date of a pending phase, a “phase not started” event is generated.
From a load point of view, it behaves like an active phase.
Children of a pending stage are pending.
Suspended: it is a project / phase that has been stopped and it is not known if / when it will restart. Suspended phases generate neither events nor load.
Children and employees of a suspended phase are suspended (if not failed).
Completed: it is a project / phase that has finished successfully. You can define rules to authorize the completion of a project (eg by default you cannot complete a project if there are ToDo in an open state). The children of a completed project are completed (if not failed).
When you put a phase in the completed state, if there are any dependencies, they will be switched from the “waiting” state to the “active” state.
Completed phases no longer generate events.
Failed: it is a project / phase that cannot be completed. The children of a failed project have failed. Employees of a failed project have failed.
A failed phase generates neither alert nor load.
Undefined: it is a state that makes the phase/ project “transparent” for the system. Typically used for project templates and simulations.
Undefined projects / phases do not generate alerts or load and are generally excluded from combos.
If you are changing the phase status, a popup will invite you to insert a reason for that change.
It is not mandatory to fill it. Every change is recorded on the phase logs and the event is sent to the notification engine.
Type: is a rough classification of the project / phase, “production” and “template” are commonly used types. You can add how many types you need by pressing “add type” button (if you have the permission).
Are you wondering what “template” means? Twproject supports copying a whole project tree with many options, so it is very easy to create a project skeleton as template. But actually any project can be used as “template” (why not?), and be used for “generating” other project.
Types can also be a base for generating project codes: see above.
Reserved: set the project as private and visible only by those assigned. Resource with a global read permission cannot see private projects.
Relevance: is how important you feel this project is for you/your company.
No computation, no constraints.
Progress: is the percentage of completeness. Twproject includes nine different automatic rules to calculate project progress.
By worklog / estimated: project progress is calculated according to the work inserted on the estimated one.
By phases (weighted): in this case Twproject considers the relevance of each phases and its progress to calculate the parent progress.
By phases completed: in this case the parent progress follow the status of its children, for example if the half of its children are closed the progress is at 50%.
By ToDo closed / total: project progress increase according to the number of its closed ToDo.
By cost / estimated & by cost / budget: Project progress increase according to costs bear in relation with estimated ones or budget.
By date: Project progress increase with end date approaching.
Different phases calculate their progress using a different rule.
Description/deliverable: use them for describing projects and delivery. No constraint on content except for size.
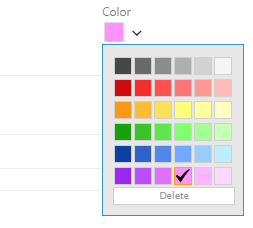
Color: you can specify a color to classify your project/phase, also visible in Gantt
Tags: Similarly to the resources case, “tags” is used to classify your phases and group them. Tags can be used to filter phases when searching.
Icon: Projects/phases can also be categorized (and most importantly searched) by Icon.
![]()
Then you have to insert who is working on the project; this is called “assignment”. See the dedicated section.
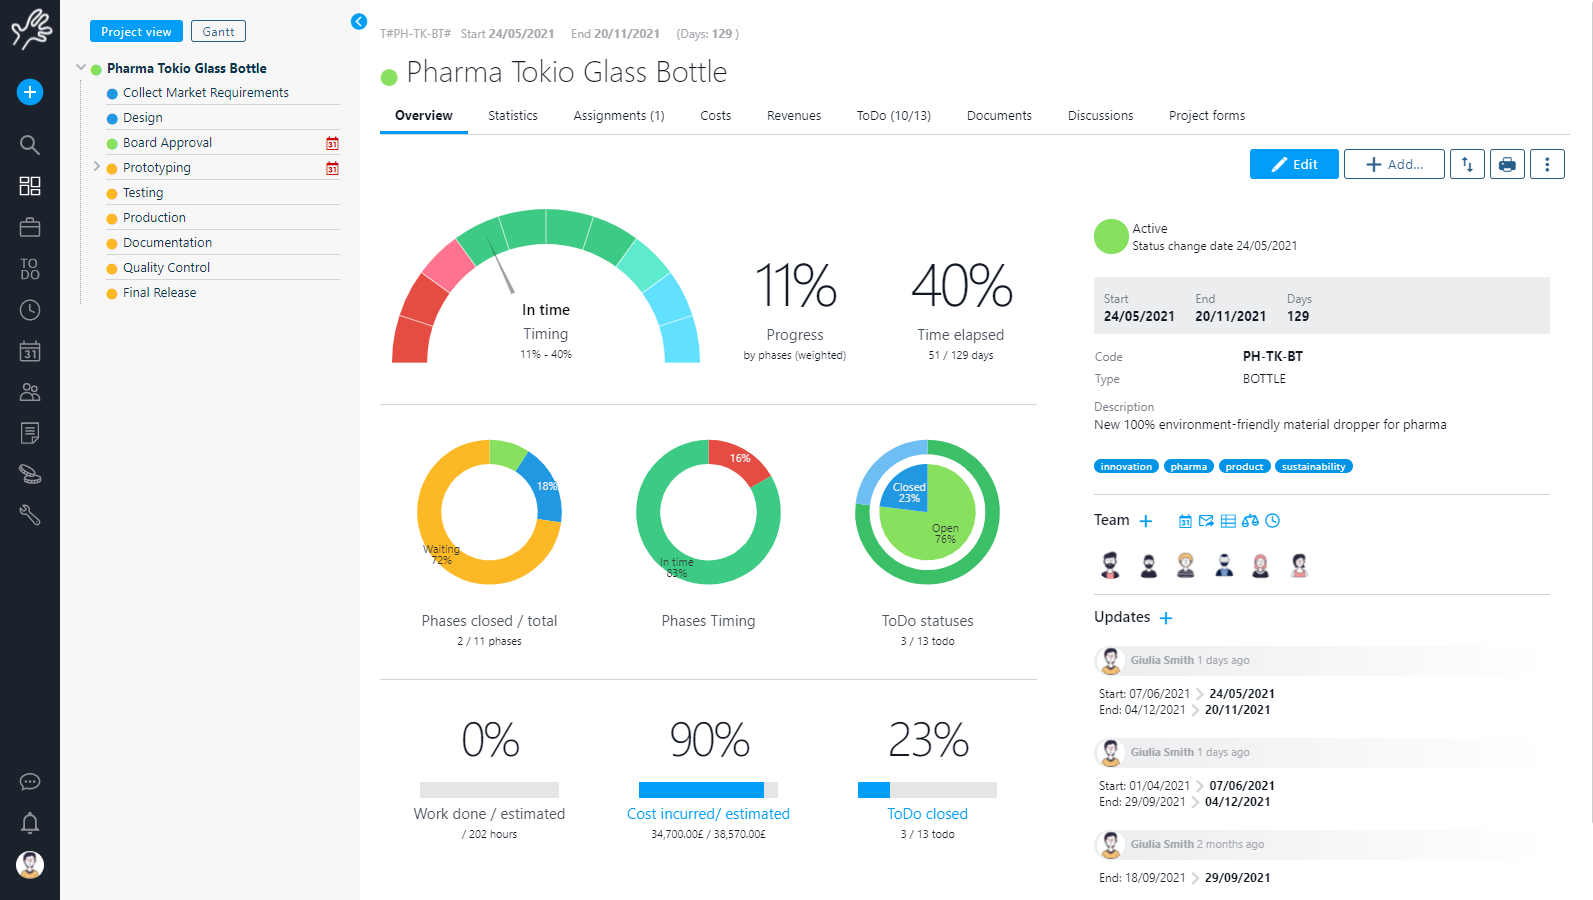
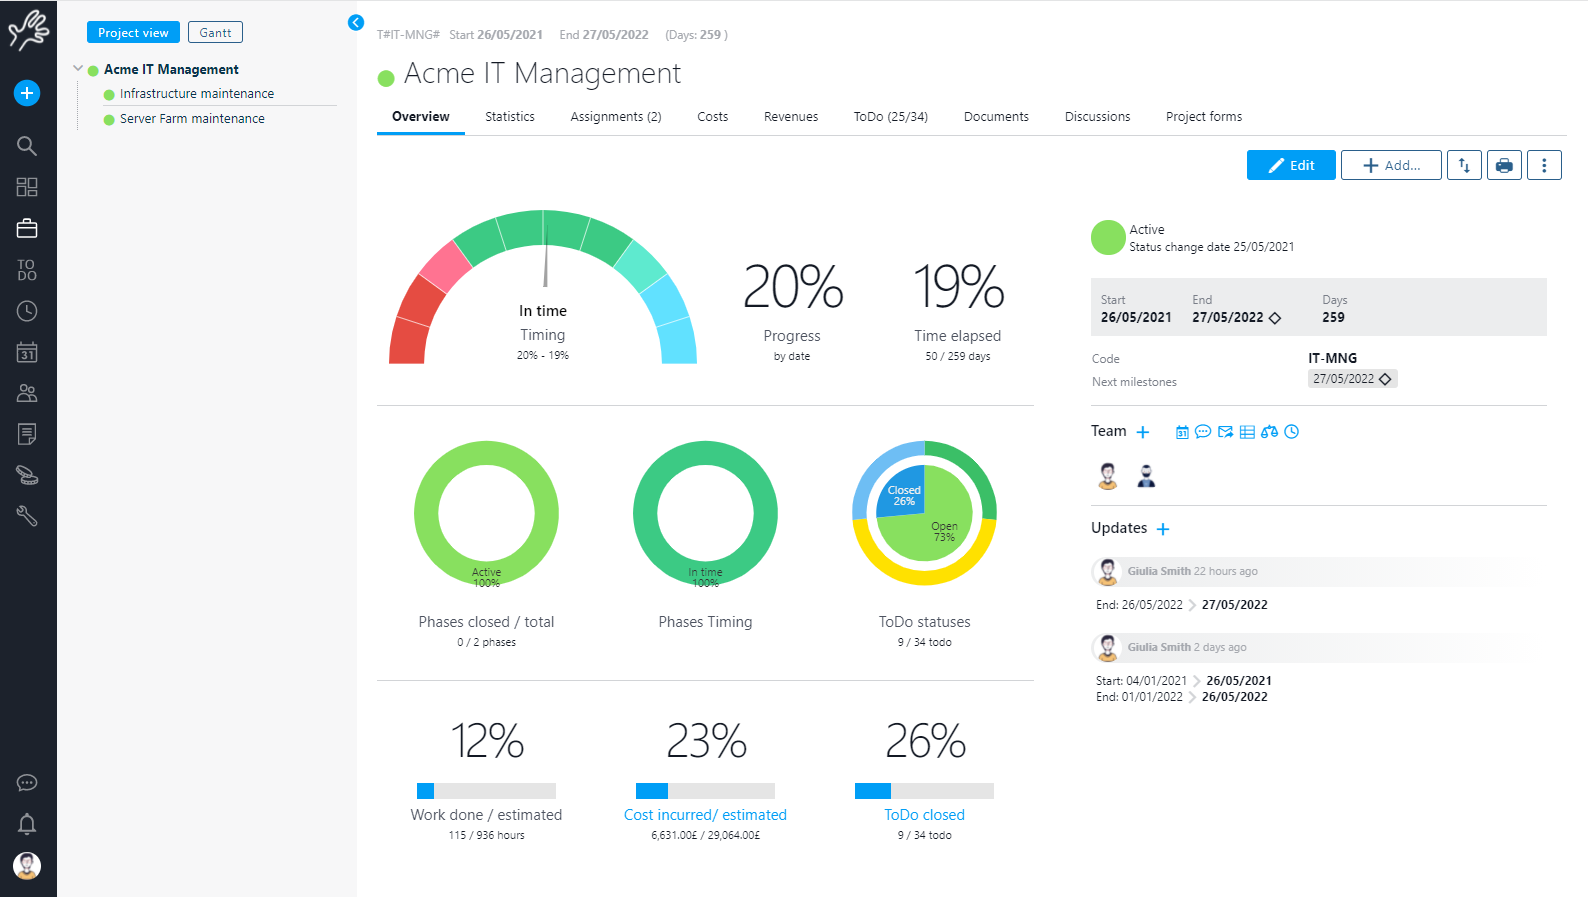
Project Overview
On the left you will find the WBS of the project. You can use it to move through phases and for creating it:
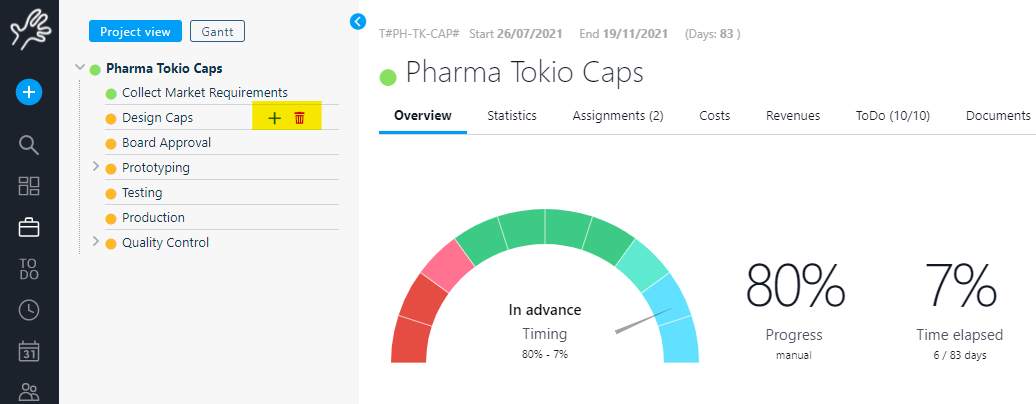
WBS will also show alerts moving through the project sections as dates error, ToDo expired, resources overloaded and so on:
WBS is the easiest way to move though the project tree.
From the left sidebar you can switch from the WBS view to the Gantt editor with the specific button:

See the specific section for Gantt editor explanation or you can watch the video tutorial.
The central part of the project overview shows you project statistics according to data inserted.
The statistics box summarizes every figure relevant for the project /phases; data in this box will give you a “feel” for the real progress of the phases.
The right part of the project overview shows the summary information inserted in the editor with the possibility to edit it with just a click, information like project complexity and risk can be inserted here.
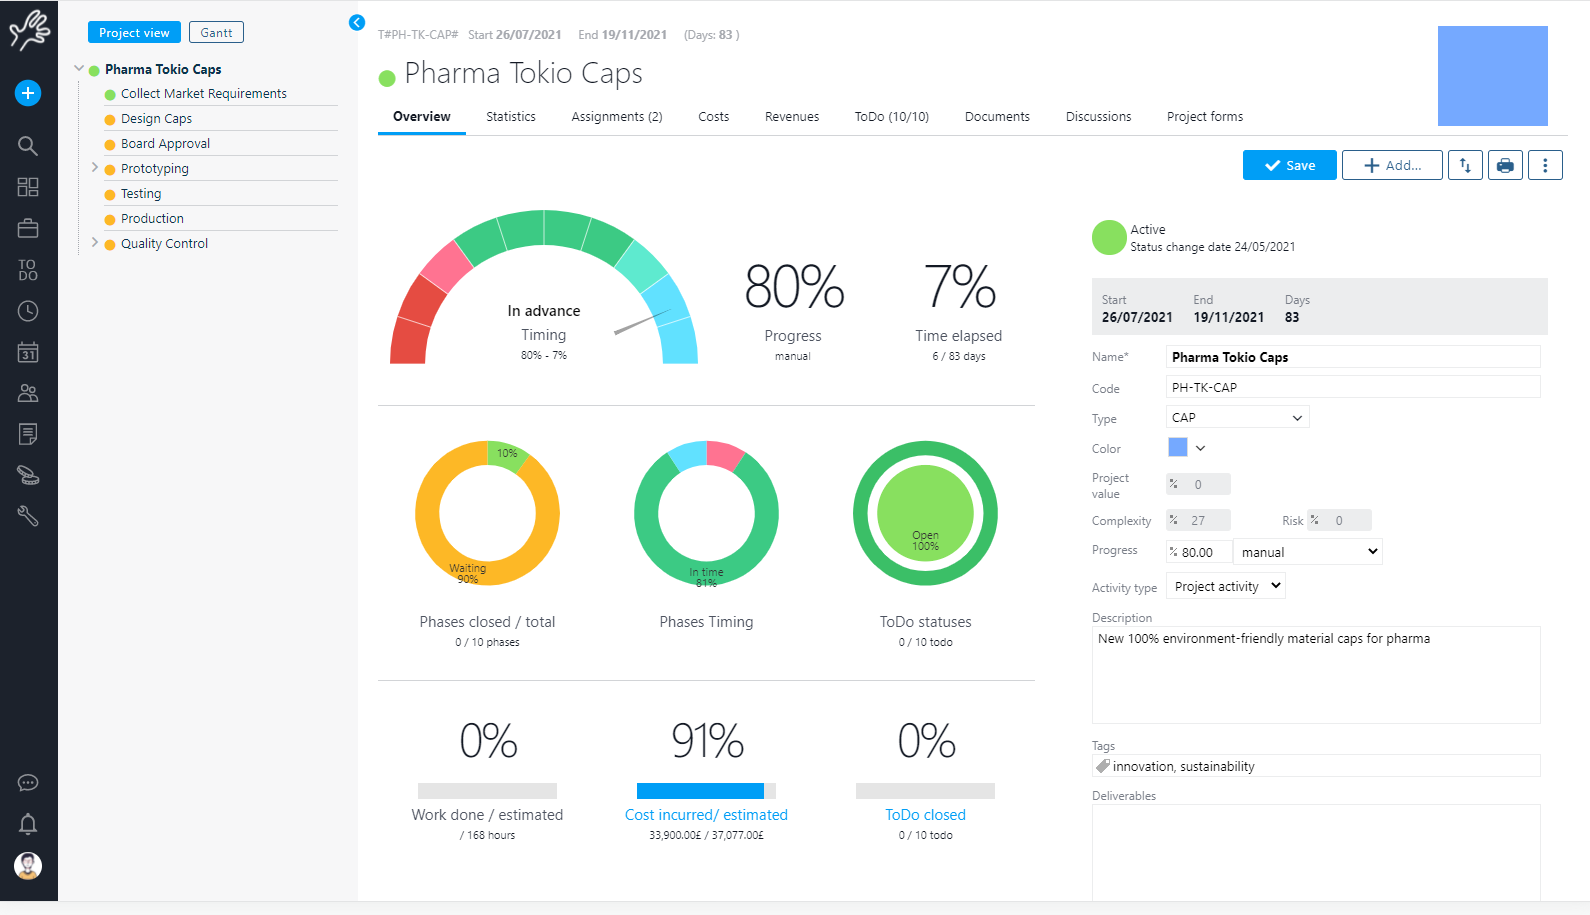
You can also set activity type for assignments that specify how workload is counted in the resource capacity page. See the work load section for details.
On the project overview page you have always a recap of who is working on it with several quick links:

Updates: dates baseline and status history
Every time you change something in your project Twproject like dates or status, and updates is created. Updates are shown in the overview page and in a specific web-part in dashboards:
Removing projects
What happens if I need to remove a project from Twproject?
Usually removing complex objects such phases or resources can have several consequences; most Twproject’ objects are linked to each other (a resource is assigned on a project with a role, a phase is part of a tree, there is worklog already inserted, there are other users listening for events and much more…), so before deleting an object Twproject will check the state and show you the real situation.
Let’s try to delete a root project.
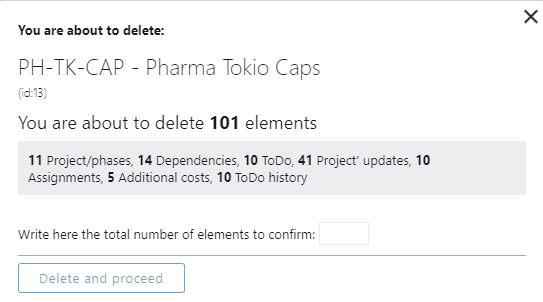
In this case Twproject will tell you that this project deletion will delete also 11 phases, 14 dependencies and so on… to perform the deletion you will need to insert the number of total elements (in this case 101) as a security check.
In some cases deletion may fail: for instance when the project has “live” references from external objects, references which cannot be removed by default; when this happens, the deletion preview pops-up again with the error message.
Every time you delete a main object (project, resource, ToDo, agenda event etc.), Twproject will show the deletion preview.
Project’s menu
On a project you can take several action available in the contextual menu:
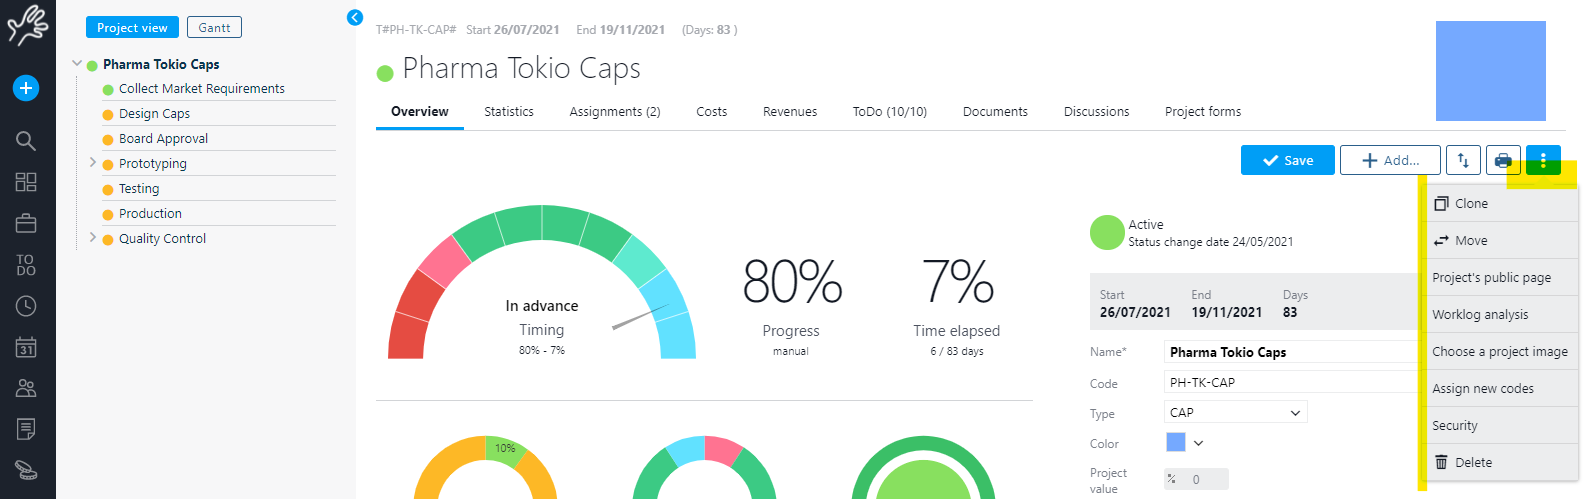
We will see the ones strictly related with the project, remanding the other to specific sections.
Create a Project from a Template (Use a Model)
You can follow the video tutorial, or the instructions below:
Twproject offers two options for reusing project structures: creating project templates and cloning existing projects (including partially cloning projects).
Let’s start with Creating a Project Template. Essentially, a template is a predefined project model that can be reused whenever you need a similar WBS structure, with similar assignments and task lists (To-dos), etc.
This allows you to save time when managing projects with recurring activities and processes.
Create a template: to create a project template, go to the project list and click on the “Add” button in the top right corner. From there, choose “Create Template” from the menu.
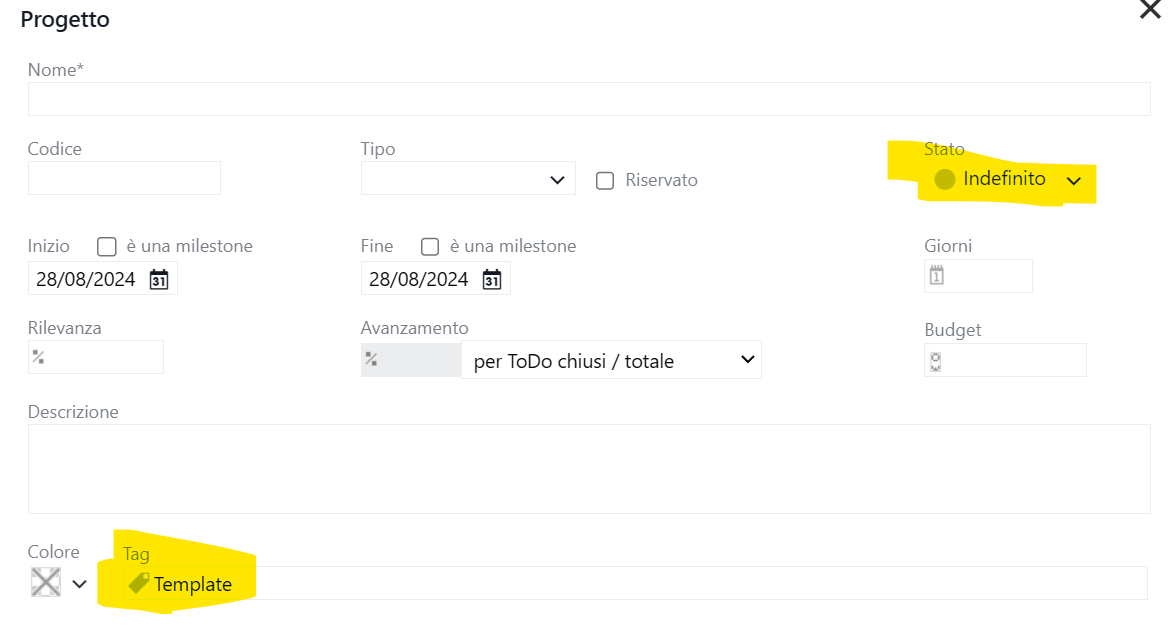
The creation of this type of template project has the characteristic of being a project like any other, but it starts in an “Undefined” state, which means it will not appear on the dashboard and is marked with the “Template” tag.
You can create it using the WBS or Gantt editor and then reuse it from multiple points.
Create a Project from a Template: to create a project from a template, go to the project list and click on the “Add” button in the top right corner. From there, choose “Create Project from Template” from the menu.
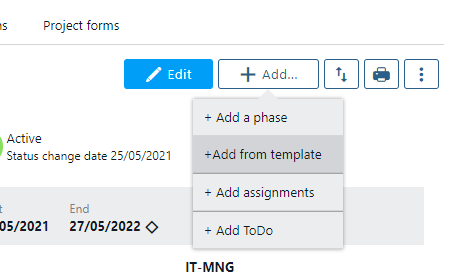
Add from template: inside a project you can add a new child from a template:
In general every project can be cloned, as you can see the copy function is quite flexible
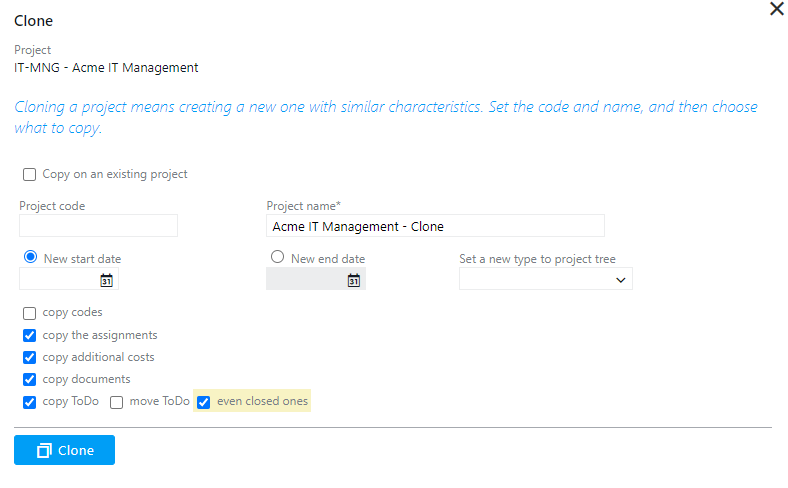
Project code: this is the code will be used for the new project. This code will be used as suffix for its children
Project name: is the name for the new root project. If the original phases has children, the new one will keep the same name
New start date: this is the new starting date. Phases will be shifted consequently. If leave empty, the original dates will be used.
New end date: this is the new end date. If you have a deadline your structure will be created from that date backward.
Type: you can assign a new type to your new project; this because often “templates” are marked as “template”, you may want to reset it to, for instance, “production”. If you leave the field empty the original type will be used.
Copy codes: check it if you want to reuse codes from the template, otherwise the code will be generated from the root code and suffixed by .1, .1.1, etc. .
Copy assignments: check it if you want to use the same assignments of the template.
Copy additional costs: check it if you want to copy additional costs. This means that you have inserted also a set of “standard” costs for you project template.
Copy document: check it if you want to copy documents.
Copy ToDo: ToDo could be used as templates, by checking “copy” you can copy the “open” ToDo to the new project. You can eventually copy also “closed” ones.
Move ToDo : this moves ToDos from the model to the new project.
This options is very useful in several cases:
Checking “copying on an existing project” you will be able to copy and move in one click only, choosing the destination parent.
Example 1: a new product release/version. In this case you’ve collected several things to do (as ToDo) on a project related to a particular version, say version 6, of your product. The team is already defined and several “ToDo” has been already closed. At a certain point you may decide to stop the development and keep the open ToDo for version 7, the next release.
In this case you can copy “version 6” project to “version 7”, keeping the team, and moving the open ToDo to next version.
Example 2: year-by-year. Twproject can be used for manage business-as-usual projects. Usually several ToDo are still open at the end of the year, using copy tool you can start for “BaU 2021” and copy to “BaU 2022”, moving open ToDo.
Press “copy” and have a look to your new project.
Clone an Existing Project
Twproject allows you to clone (or duplicate) an entire project or a part of the structure of an existing project. This feature is useful when you need to start a new project that is similar to or almost identical to one that has already been developed. Cloning enables you to easily reuse existing projects, saving time and effort.
Move project
Moving a project is a less used function useful when you want to move a project somewhere else.
When you decide to move a project you have to specify a new parent, or if you are moving a child, just leave “new parent” empty to “promote” a sub-project (a child) as project (a root). Again you’ll end up in the project editor.
All data recorded for a project is local to the project. So when moving a project, worklogs, costs, ToDos will be moved with it.
Project’ public page
Twproject can expose project data using public pages; this page will not require any login.
Please watch the video tutorial.
By default public pages are not active, once enabled it will present selected information.
It is a way to automate distribution of information always updated from Twproject to people that do not access it.
From the project overview, in the additional functions button, click on public page button.
The pages will be available at URL of the form
[http://your Twproject address]/project/[project id]
When enabling such pages, there are several options available:
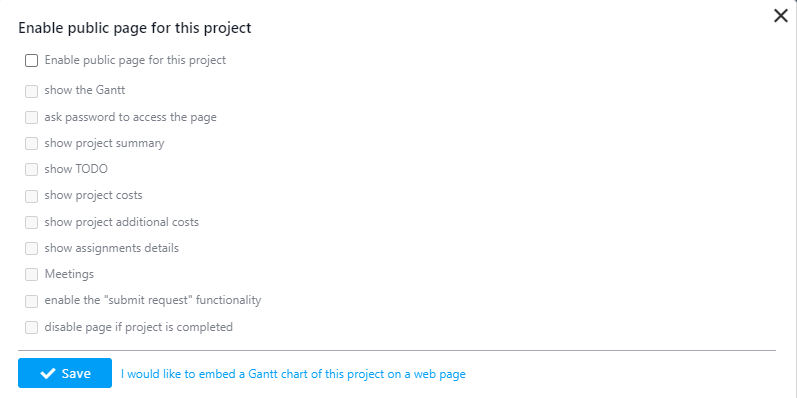
At first you have to enable this page and save before getting the options enabled. Most options are self explanatory, but:
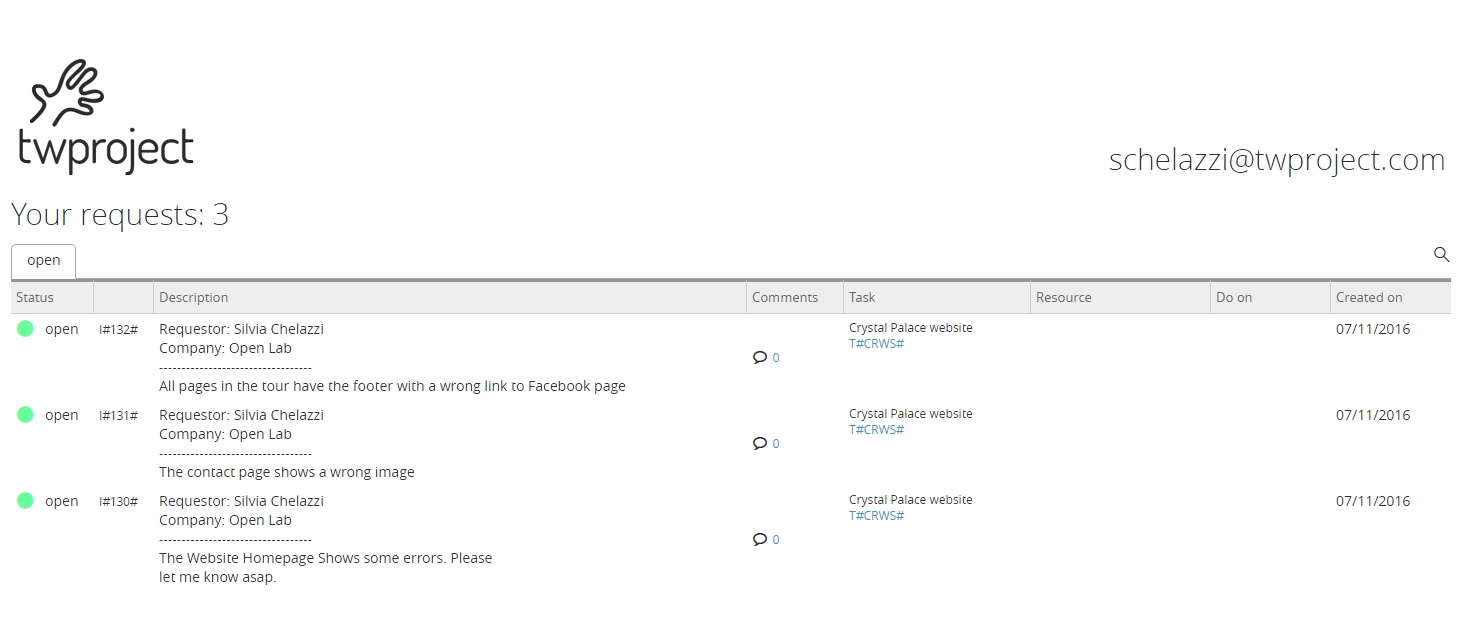
– “enable send request”: if you enable this option, visitors of the page will be able to submit ToDo/ features on such project: the ticket will be saved as an open, unassigned ToDo on the project.
– “ask key to access the page”: access to the page will be protected by a key which you define and will be requested on access.
This is an example resulting page:
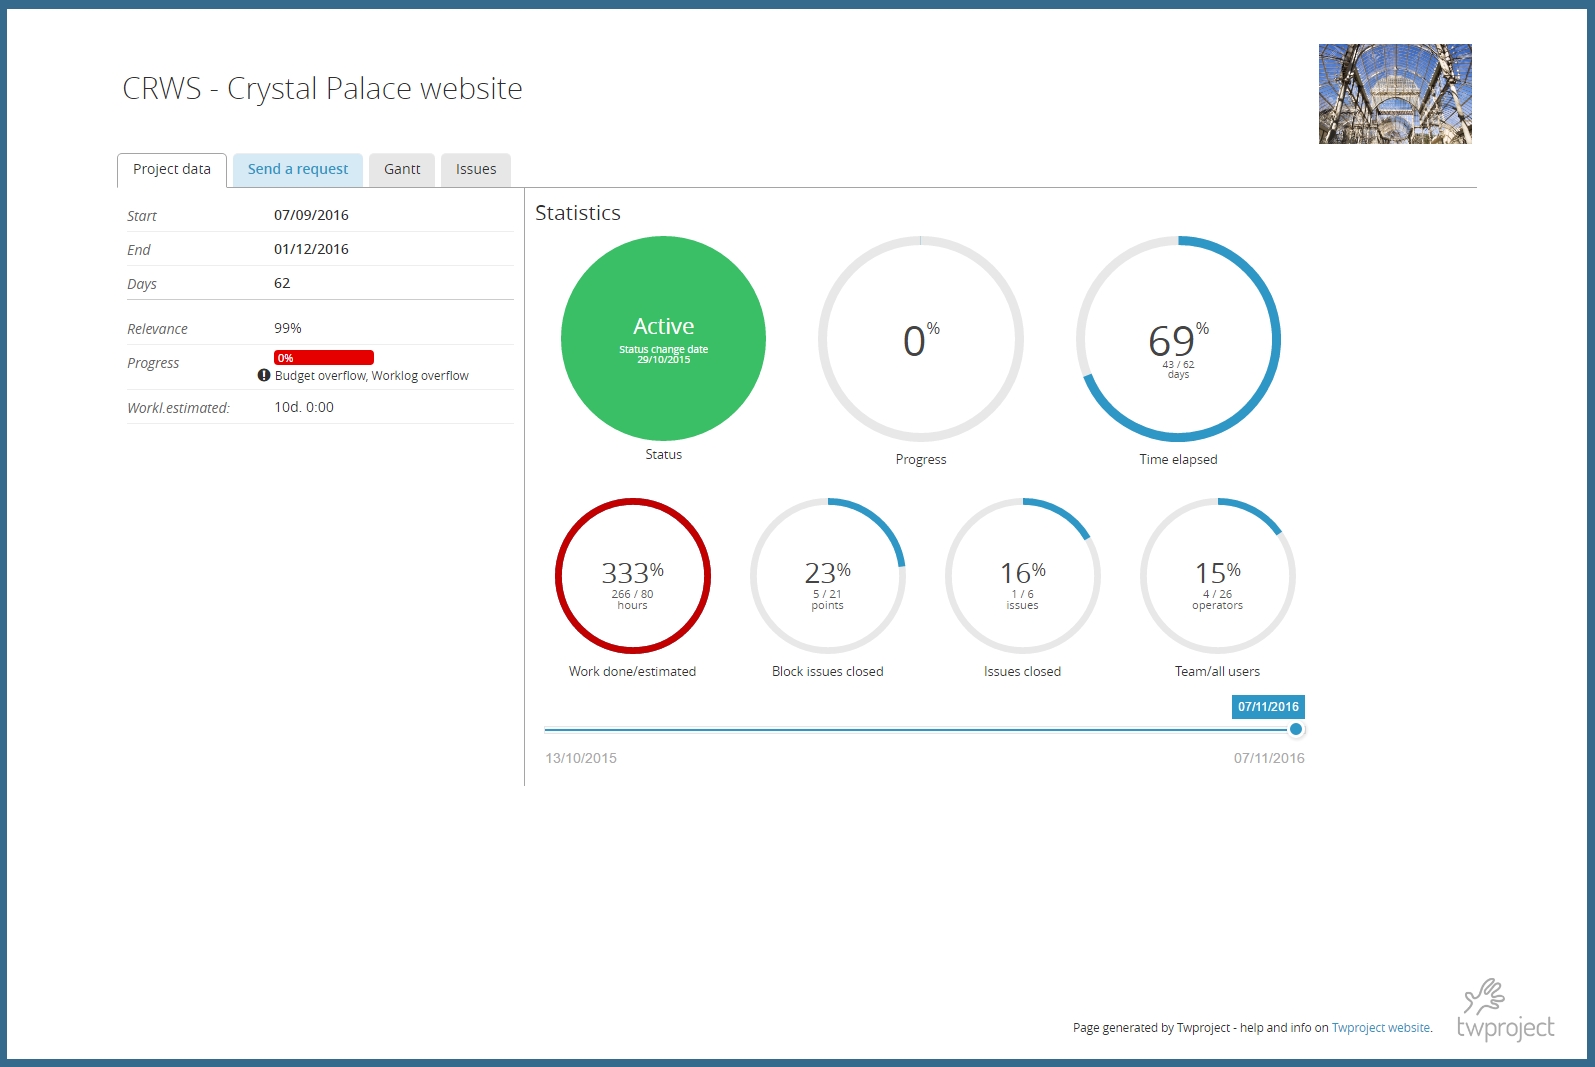
According to what has been enabled we see the summary of the project data with statistics, the second tab is the one dedicated to submit request, then we have the Gantt chart of the project and the list of open ToDo.
Costs, and assignments details can be enabled too.
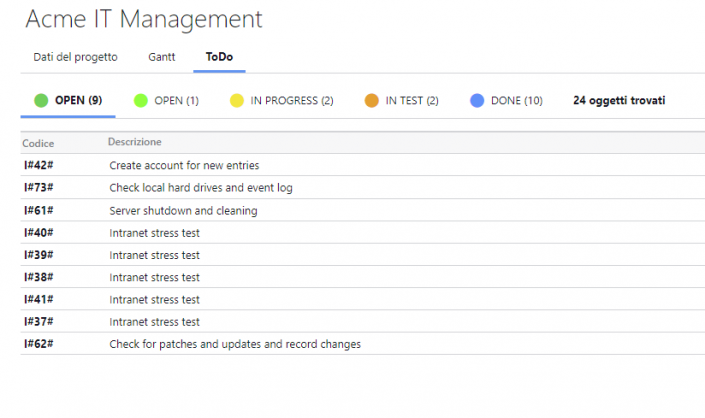
Todos list has been splitted into as many tabs as todo types. Thus reading is much easier!
Email Ticket Closed Loop
Thanks to project public pages you can let your customers submit request, bugs and features easily with a dedicated page.
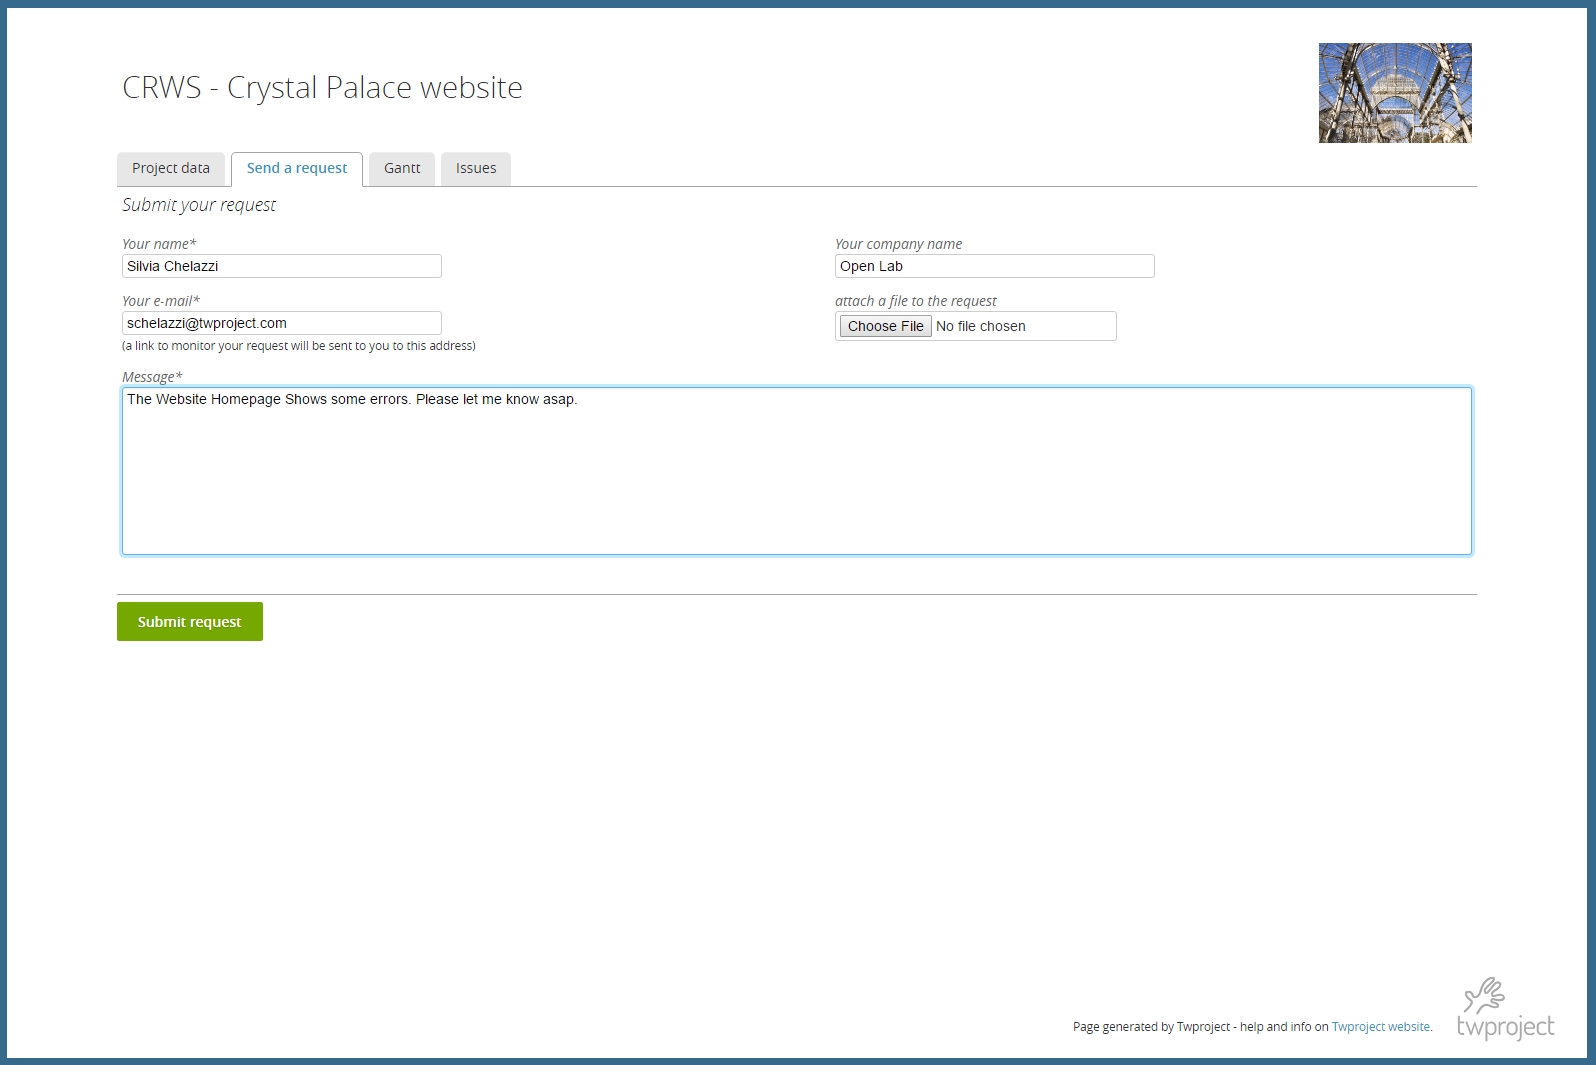
Every ticket submitted will be inserted as an open, not assigned, ToDo on your project. Assignee will be notified by e-mail about the new ticket and the customer too will receive an e-mail with a special link to check and monitor the list of ToDo submitted.
Replying directly to this email notification, both, the assignee and the customer, can communicate directly, always passing through Twproject.
All notes written in the e-mail stream will be added as comments in the Twproject ToDo.
Project security
This allows you to make a project private or take the ownership. For more details see Security.
If you want to link directly to a project or phases via a URL, use:
http://[your root]/project/X
where X is the ID or the code of the project or phases.
Assign new code
This functionality can be used to adjust project codes. When you are on project with children you can set a new code and all the tree below will be adjusted:
Example:
Inserting NEW_CODE as code you will get something like this for the tree
- NEW_CODE.01
- NEW_CODE.01.01
- NEW_CODE.01.02
- NEW_CODE.02
- NEW_CODE.03
You can print a report of your project, by clicking on the printer icon button.
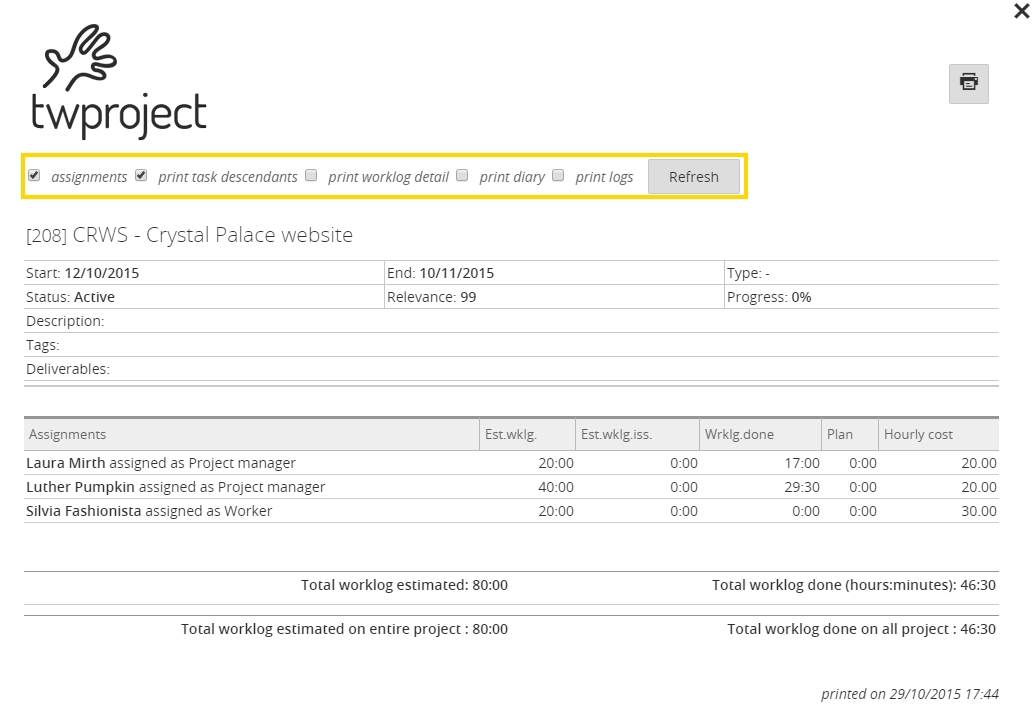 This is not just a print of the page, but has several options that can be used on needs; your options will be preserved for next usages. Now the printer icon will really print what you see using the browser default.
Cross links
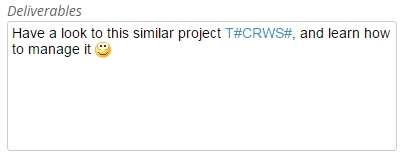
![]() Notice in the top-left part of the project editor there is a project internal “code”, which every saved project has: T#HWS#. This code allows you to link to this project editor from every other editor in Twproject. For example, if on any (other) project editor in the “description” or “deliverables” fields you write such code, this will turn into a link.
Notice in the top-left part of the project editor there is a project internal “code”, which every saved project has: T#HWS#. This code allows you to link to this project editor from every other editor in Twproject. For example, if on any (other) project editor in the “description” or “deliverables” fields you write such code, this will turn into a link.
In this way you can cross link any project to any other, and more – see below.
Cross linking supports links between: projects (T#CODE#), ToDo (I#CODE #), resources (R#CODE #), agenda events (E#CODE #), agenda meetings (M#CODE #), (B#ID#) boards, where the value of “CODE” is shown in the editors.
Actually the text in the text area supports also HTTP links, images and smileys: you can get a description like this one:
with active links.