Welcome! Have you just started testing Twproject and need some advice? You are in the right place, we will see together step by step how to move through the application and at the end of reading you will be ready to go!
First access
The registration process should have landed you on your first project page, congratulations, well done!
Let’s see how the page is made up of an example project:

The box on the left represents the WBS, the phase structure of your project, this structure was created starting from the template you chose but you can obviously change it.
The WBS is like a tree to navigate each phase of the project, you can move from phase to phase because each of them has its own information and progress.
The box at the top is the tabset that allows you to navigate in all the sections that make up your project, such as the statistics where you will find the history of your project which will be composed independently as time passes and your project evolves .
The tabset also includes assignments, where you can specify who works on the project (wait! We’ll create the resources together in a moment), the costs and revenues of the project, the ToDos which represent all the tasks that compose it and much more.
Finally in the central part you see all project information and progress, at the moment they are all at zero, but by working on the project, recording the hours, closing the ToDos, these will change in real time and will always tell you where you are at.
As mentioned earlier, by navigating the WBS on the left you will be able to see the statistics of each phase of the project, you understood correctly, you will be able to monitor not only the progress of the project as a whole but also of the individual phases.
At this point you may be curious to browse a bit and perhaps understand how to change the structure to make it more similar to your real project, the simplest way is from the Gantt, you can find it at the top left:

This is what you will find in front of you:
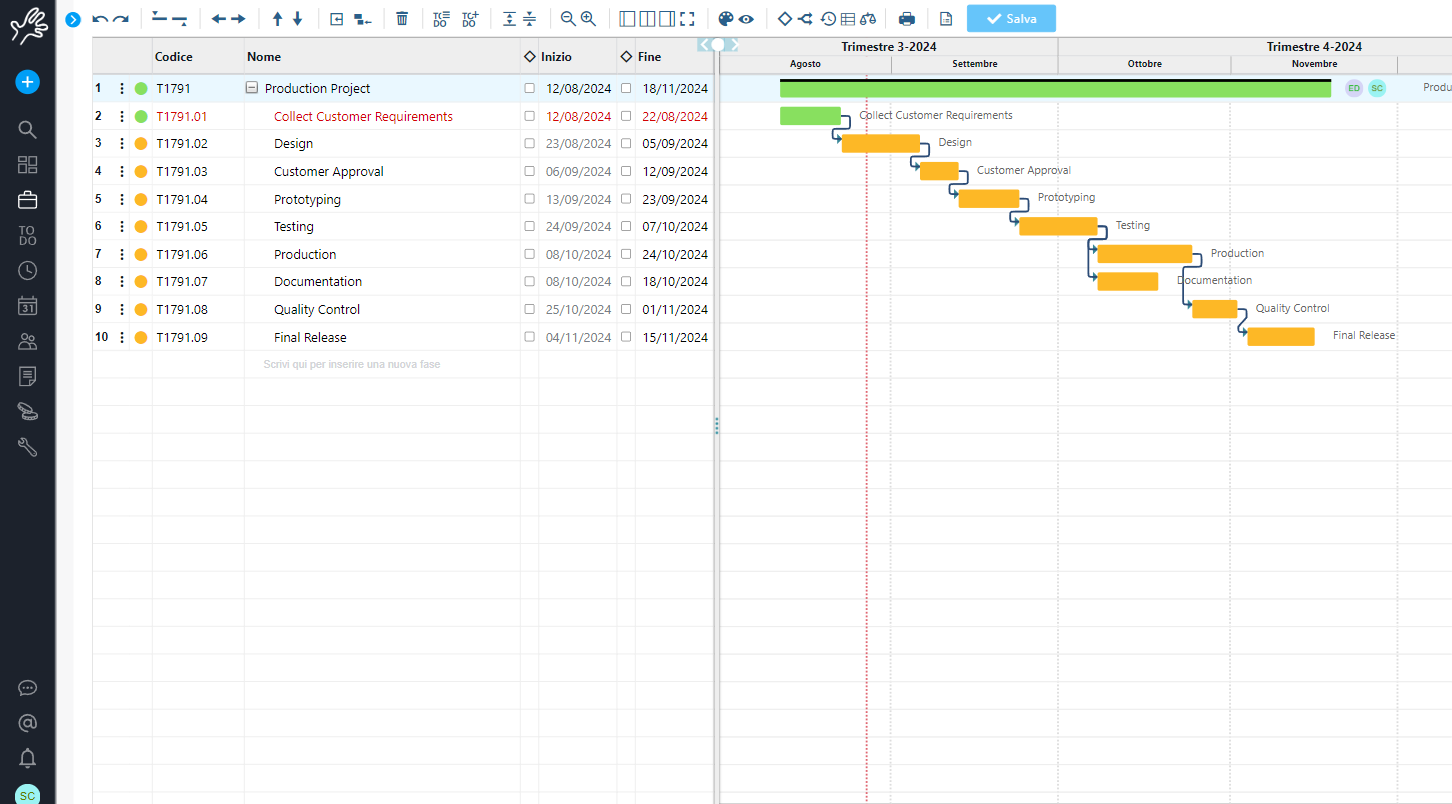
Our Gantt is very simple to use, you can change the titles, the dates, both in the text part on the left, and by dragging the boxes on the right part, you can create dependencies and set milestones.
If you want a guide I invite you to watch this video which describes it in detail:
Now that we have seen together how a project is structured, let’s move to the dashboard that you can find simply by clicking on the Twproject logo at the top left (the hand!)
This page allows you to access the main information concerning you, for example I already have 2 ToDos late 😉
The page includes also a link to the project just created.
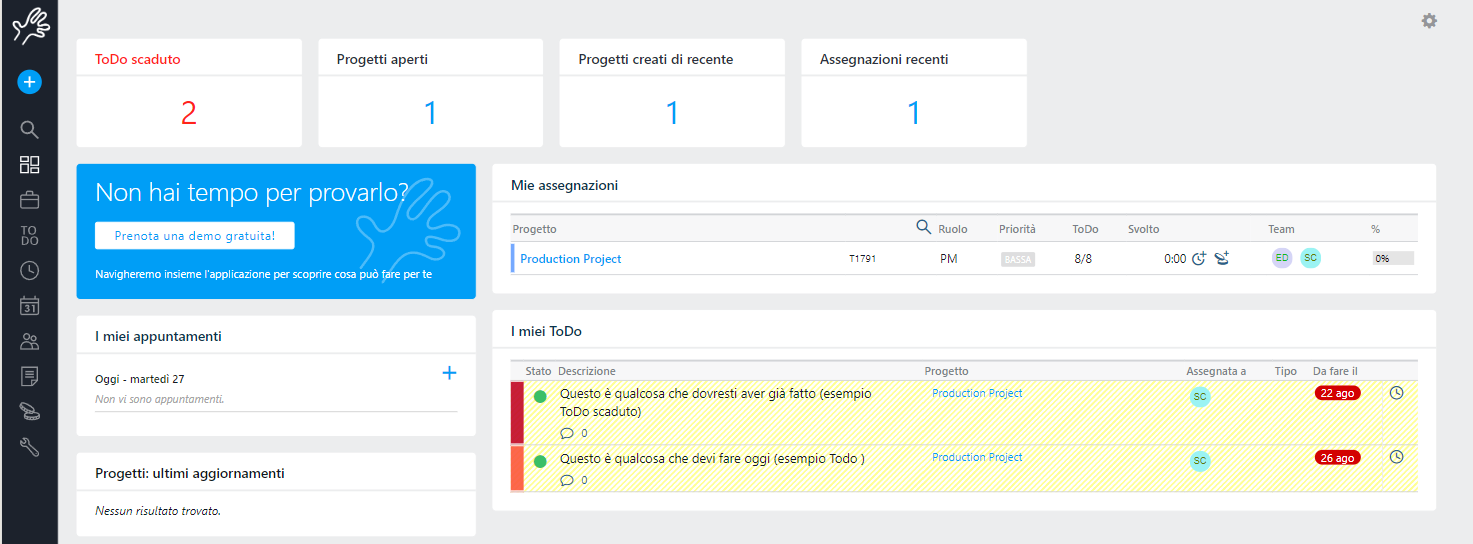
The dashboard can be customized but for the moment rely on the default one, before modifying it you must understand what you really need.
Menu
Now let’s see together what the items are included in the menu so you will be able to explore it independently, each item will open a submenu but let’s see the macro-groupings together:
 This is the application logo and takes you back to your dashboard
 This is the quick menu for creating a new project and various system objects, such as ToDo, People etc.etc.
![]()
From the lens you can search throughout Twproject, in all objects, not only in titles but also in descriptions.
![]() This icon allows you to see all the dashboards available, created by the application at startup. You will find the one designed for the pm, for the operational user and the one for the supervisor.
This icon allows you to see all the dashboards available, created by the application at startup. You will find the one designed for the pm, for the operational user and the one for the supervisor.
![]() From here you can access the projects section where you will find all the projects and phases assigned to you. This page works by applying a filter on your assignments but you can change the filter and save it.
From here you can access the projects section where you will find all the projects and phases assigned to you. This page works by applying a filter on your assignments but you can change the filter and save it.
![]() Here you will find all your ToDos, i.e. the micro activities assigned to you on the projects in which you are involved. ToDos are a very useful feature of Twproject that you can learn more about in this video: https://youtu.be/B1_Y_8sK5Og?si=ghGnVO0WyhagNIIw
Here you will find all your ToDos, i.e. the micro activities assigned to you on the projects in which you are involved. ToDos are a very useful feature of Twproject that you can learn more about in this video: https://youtu.be/B1_Y_8sK5Og?si=ghGnVO0WyhagNIIw
![]() From this icon you will reach the Working times section to enter the hours worked on the various projects. With Twproject you can easily record hours in many different ways: https://youtu.be/v4OJhOdybbI?si=6nvyXcyWEI7uZwvU
From this icon you will reach the Working times section to enter the hours worked on the various projects. With Twproject you can easily record hours in many different ways: https://youtu.be/v4OJhOdybbI?si=6nvyXcyWEI7uZwvU
![]()
Twproject also includes an agenda that allows you to enter holidays, permits, illnesses, all information that will be taken into consideration when evaluating the resource load.
![]() And here we are in the resources section, where you can insert all your colleagues but also collaborators and customers. If you want to involve a colleague of yours in the test you are doing, this is where you need to come in. Click on the first item of the submenu (resource list) and add a new one with the button on the right. Once you have saved your details you must move to the security/login tab where you will have to create a user login. With the username and password that you create, he will be able to access the same workspace as you.
And here we are in the resources section, where you can insert all your colleagues but also collaborators and customers. If you want to involve a colleague of yours in the test you are doing, this is where you need to come in. Click on the first item of the submenu (resource list) and add a new one with the button on the right. Once you have saved your details you must move to the security/login tab where you will have to create a user login. With the username and password that you create, he will be able to access the same workspace as you.
![]()
From this section you will be able to search for all the documents you have inserted into Twproject in the various projects. In Twproject all the documents uploaded are indexed and you will be able to search them through the lens not only by title but also by content.
![]()
This is the section that allows you to access the summary pages of costs, revenues, expense reports and hours worked on projects. All list pages can be exported to Excel.

The final part of the menu concerns your user, you will be able to find in order from the top the chats you have activated or those in which you are involved, messages from colleagues who mention you, notifications about your projects and finally your avatar from which you log in to all your info and options.
As you will have understood, Twproject allows you to manage everything that revolves around your projects, let’s make a brief summary:
Once you have created your first project, explore it in all its parts, you will be able to change the structure from the interactive Gantt, try to insert costs and perhaps revenues, you will see that after the first clicks navigation will become simple and intuitive.
This is a short video describing the idea of Twproject objects.
If you want to try to refine the things to do, use the ToDos and maybe after a few attempts you will be ready from the projects section to create a new one from scratch that truly represents YOUR project!
At this point you are ready to create some resources that you can assign, if you don’t want to involve them, don’t create access for them, simply enter their basic details and you will find them in the drop-down menu to be able to assign them, with the assignments you can also enter the work estimates, the costs will be calculated in real time and so will the workload!
With the information on the menu you should be able to move and find what you need, but here you will find many other tutorials to learn more about, for example, do you know that in Twproject you can use templates?
Feel free to browse our guide to learn more about the sections and write to us if you have further doubts!