
Project timelines are one of the most critical tools in project management. They help you visualize the entire scope of work, plan activities and resources, and make sure everyone knows what to do and when to do it.
Without a clearly defined timeline, any project risks becoming a series of disjointed tasks with unclear deadlines and confusing responsibilities. When the timeline is well structured, however, it becomes a roadmap that guides the team toward achieving the project’s objectives.
In this article, we will look at what a timeline is, why it is essential in project management, and how to create an effective project timeline.
CONTENT
- What is a project timeline?
- Why is the project timeline so important?
- How to create an effective project timeline
- 1. Define project goals
- 2. Break down the project into activities
- 3. Estimate activity duration
- 4. Identify dependencies between activities
- 5. Assign tasks to team members
- 6. Visualize your timeline
- How to manage your project timeline with Twproject
- Best practices for an effective project timeline
What is a project timeline?
A project timeline is a visual depiction of the sequence of all activities that make up a project.
In other words, it clearly shows:
- project stages
- the duration of each activity
- dependencies between activities
- deadlines
- team members involved
This timeline view of the project allows the project manager and everyone involved in the project to gain a complete overview of the work to be carried out.
The timeline is therefore not just a calendar of activities, but a strategic tool for coordinating the workflow and ensuring that all activities proceed in the correct sequence.
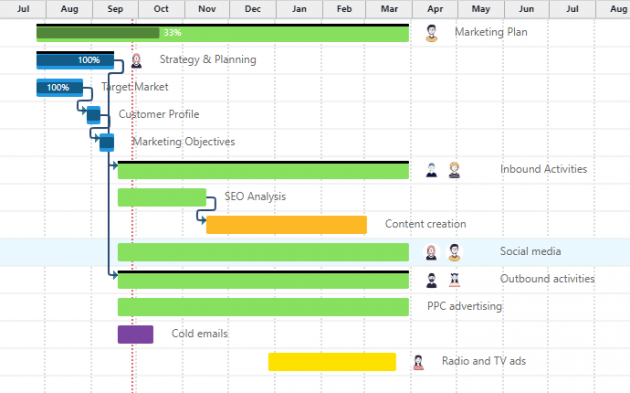
In most cases, the timeline can be viewed using graphical tools such as Gantt charts, which provide a visual representation of the duration of activities and their relationships.
Why is the project timeline so important?
Many projects fail not because of a lack of expertise, but because of unclear planning. This is where the timeline comes into play.
During the planning phase, defining the timeline helps to structure work and minimize uncertainty.
There are numerous key benefits.
1. Provides a clear overview of the project
The timeline should be the benchmark for everyone involved in the project.
Thanks to the chronological sequence of activities, all team members can get a clear picture of:
- what will happen during the different stages of the project
- when each activity will start and end
- which activities depend on others
This makes project planning much clearer and easier to understand..
2. Improves team coordination
When activities are not well organized in terms of time, the risk of overlapping or delays increases.
With a structured timeline, however, those involved in the project know exactly when they need to take action and which tasks need to be completed before starting subsequent ones.
This helps to keep the workflow steady and coordinated.
3. Provides progress monitoring
Another important benefit is the option to keep track of the project status.
By comparing the planned timeline with the actual progress of activities, project managers can determine whether their project can be completed on schedule or if adjustments are needed.
This makes the timeline a key tool for control and monitoring too.
4. Reduces risks and delays
By visualizing your project over time, you can quickly identify:
- bottlenecks
- critical dependencies
- activities with overly tight deadlines
In this way, you can take action before problems cause significant delays.
With this approach, a well-designed timeline becomes a risk prevention tool.
5. Align your entire team on objectives
The timeline directly connects activities to project goals.
This means that anyone involved can easily see how their work impacts the final outcome. When the team has a shared view of the roadmap, collaboration becomes much more effective.
How to create an effective project timeline
Now let’s take a look at the basic steps for creating a solid and functional project timeline.
1. Define project goals
The first step involves clarifying what you want to achieve.
Project goals must be established before any planning activities begin.
Only after determining the final outcome will it be possible to understand:
- what activities need to be carried out
- how much time will be required
- what resources will be involved
This step serves as the foundation for project planning.
2. Break down the project into activities
A complex project can be challenging to manage if considered as a single unit.
Therefore, it is crucial to break it down into smaller tasks.
Each project can be organized into:
- macro phases
- sub-tasks
- milestones
This structure helps to accurately identify each task necessary to successfully complete the project.
3. Estimate activity duration
After defining the activities, you need to determine how much time each one will take.
The duration can be estimated by analyzing:
- past experiences
- task complexity
- resource availability
A realistic estimate is essential for building a reliable timeline.
4. Identify dependencies between activities
Not all activities can start at the same time.
Often, some tasks must be completed before others can begin.
Identifying these relationships is essential for building the correct workflow.
For example:
- planning must be completed before development
- development must be completed before testing
5. Assign tasks to team members
An effective timeline involves not only tasks but also people.
For this reason, each task should be assigned to a specifically designated individual.
Team members must know:
- which tasks fall within their competence
- which deadlines they must meet
- with whom they must collaborate
This helps to avoid confusion and overlaps.
6. Visualize your timeline
After collecting all your information, you need to visualize your timeline.
The most commonly used tools are Gantt charts, which show:
- activity duration
- relationships between activities
- temporal sequence of work
This type of visualization makes the project structure immediately clear.
How to manage your project timeline with Twproject
In everyday project management, the timeline must not only be planned, but also updated and monitored.
This is where project management software such as Twproject comes into play.
The timeline integrated into the system allows you to monitor project progress over time and automatically record the most important changes. This way, you can see how your project is progressing compared to the initial plan, called the baseline.

Among the most useful features are:
Project event monitoring: the timeline allows you to automatically record relevant events such as:
- changes to start or end dates
- budget changes
- significant updates
This information is shown directly on your timeline, allowing your project manager to quickly identify when and where changes have occurred.
Time navigation: : another valuable feature is the ability to navigate back and forth along the timeline.
This feature allows you to:
- analyze your project status on a particular date
- compare the actual situation with the initial plan
- understand how the project has evolved over time
This makes it easier to understand business trends and improve the management of future projects.
Project status snapshots: Twproject also provides the option to save “snapshots” of the project at specific moments.
These snapshots allow you to preserve the state of the project on a specific date and easily locate it on the timeline.
This feature is particularly useful in long-term projects, where it is important to remember the key moments in the evolution of the work.
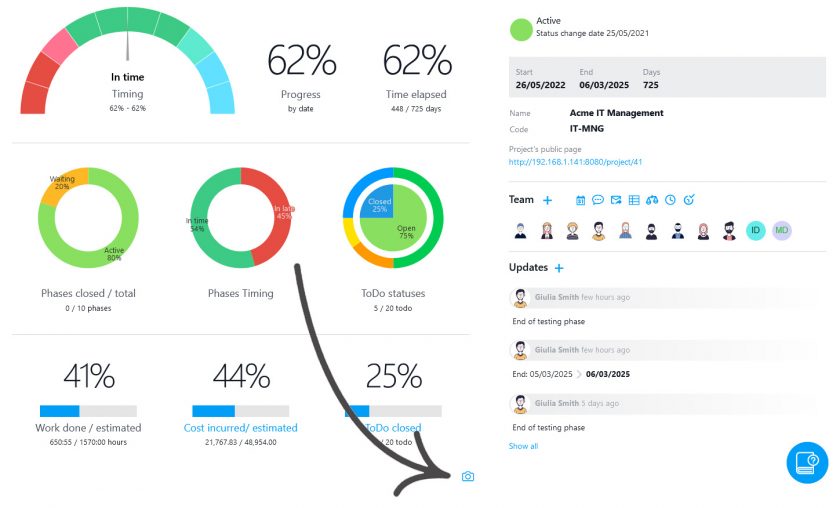
Real-time updates: One of the main perks of using project management software is the possibility to get real-time updates.
When tasks are modified or completed, the timeline automatically updates, keeping all team members aligned on project status.
Best practices for an effective project timeline
To truly capitalize on this tool’s potential, it is helpful to follow a few best practices.
1- Keep your timeline simple
An overly complex timeline can become challenging to understand.
It is better to focus on the elements that are truly useful:
- main activities
- milestones
- critical dependencies
2- Keep your timeline up to date
An outdated timeline quickly loses its value.
Throughout the course of the project, activities may be modified, brought forward, or delayed.
Updating the timeline ensures that you always maintain a realistic picture of the situation.
3- Involve your team in the planning process
Your timeline shouldn’t be created exclusively by the project manager.
Getting your team members involved in the planning phase will help you obtain more accurate estimates and improve coordination.
A project timeline is much more than just a list of activities.
It is a strategic asset that helps you organize work, coordinate your team, and monitor progress.
When done right in the planning phase, the timeline becomes a real roadmap for project success.
Thanks to project management tools such as Twproject, you can not only create a project timeline, but also monitor and update it in real time, keeping track of how the work is progressing.
Since projects are getting increasingly complex, a clear, shared timeline can make the difference between a disjointed project and one that’s successfully completed.


